Unenroll Surface devices from SEMM
When a Surface device is enrolled in Surface Enterprise Management Mode (SEMM), a certificate is stored in the firmware of that device. The presence of that certificate and the enrollment in SEMM prevent any unauthorized changes to Surface UEFI settings or options while the device is enrolled in SEMM. To restore control of Surface UEFI settings to the user, the Surface device must be unenrolled from SEMM, a process sometimes described as reset or recovery. There are two methods you can use to unenroll a device from SEMM—a Surface UEFI reset package and a Recovery Request.
Warning
To unenroll a device from SEMM and restore user control of Surface UEFI settings, you must have the SEMM certificate that was used to enroll the device in SEMM. If this certificate becomes lost or corrupted, it is not possible to unenroll from SEMM. Back up and protect your SEMM certificate accordingly.
For more information about SEMM, see Microsoft Surface Enterprise Management Mode.
Unenroll a Surface device from SEMM with a Surface UEFI reset package
The Surface UEFI reset package is the primary method you use to unenroll a Surface device from SEMM. Like a Surface UEFI configuration package, the reset package is a Windows Installer (.msi) file that configures SEMM on the device. Unlike the configuration package, the reset package will reset the Surface UEFI configuration on a Surface device to its default settings, remove the SEMM certificate, and unenroll the device from SEMM.
Reset packages are created specifically for an individual Surface device. To begin the process of creating a reset package, you will need the serial number of the device you want to unenroll, as well as the SEMM certificate used to enroll the device. You can find the serial number of your Surface device on the PC information page of Surface UEFI, as shown in Figure 1. This page is displayed even if Surface UEFI is password protected and the incorrect password is entered.
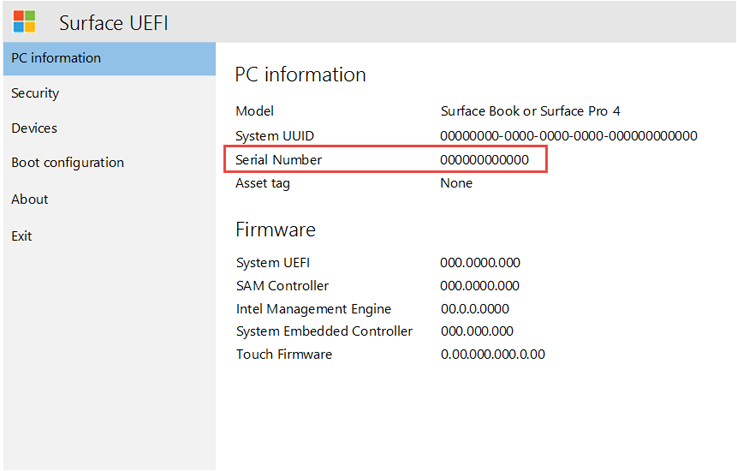
Figure 1. The serial number of the Surface device is displayed on the Surface UEFI PC information page
Note
To boot to Surface UEFI, press Volume Up and Power simultaneously while the device is off. Hold Volume Up until the Surface logo is displayed and the device begins to boot.
To create a Surface UEFI reset package, follow these steps:
Open Microsoft Surface UEFI Configurator from the Start menu.
Click Start.
Click Reset Package, as shown in Figure 2.
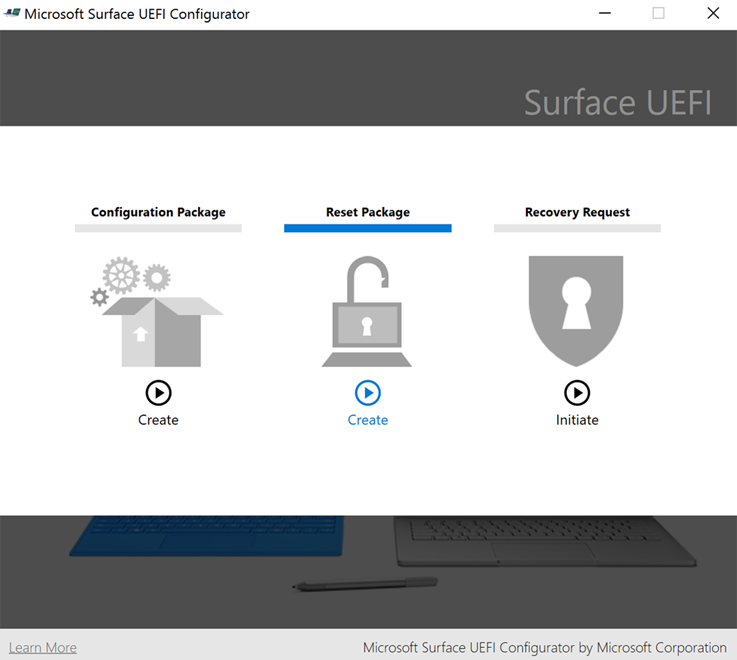
Figure 2. Click Reset Package to create a package to unenroll a Surface device from SEMM
Click Certificate Protection to add your SEMM certificate file with private key (.pfx), as shown in Figure 3. Browse to the location of your certificate file, select the file, and then click OK.
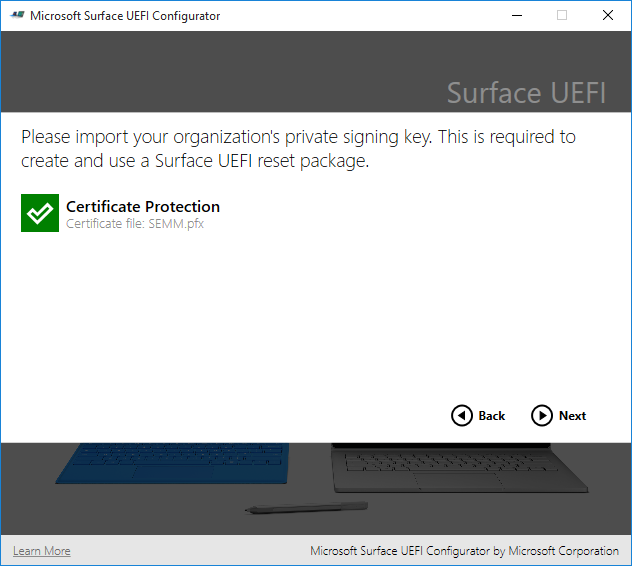
Figure 3. Add the SEMM certificate to a Surface UEFI reset package
Click Next.
Type the serial number of the device you want to unenroll from SEMM (as shown in Figure 4), and then click Build to generate the Surface UEFI reset package.
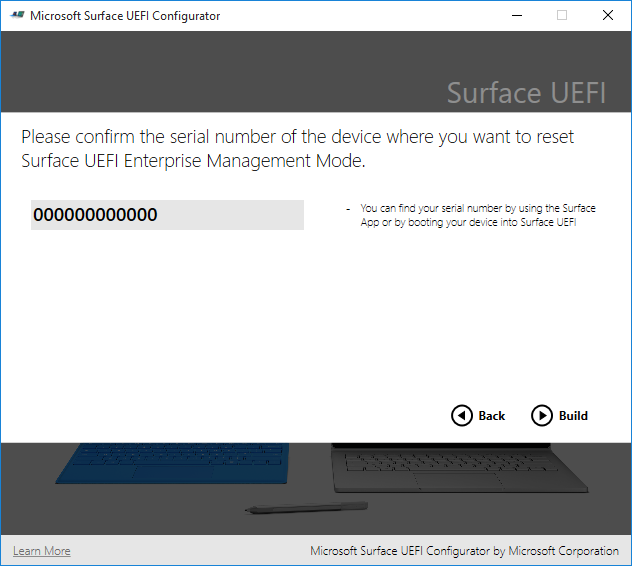
Figure 4. Use the serial number of your Surface device to create a Surface UEFI reset package
In the Save As dialog box, specify a name for the Surface UEFI reset package, browse to the location where you would like to save the file, and then click Save.
When the package generation has completed, the Successful page is displayed. Click End to complete package creation and close Microsoft Surface UEFI Configurator.
Run the Surface UEFI reset package Windows Installer (.msi) file on the Surface device to unenroll the device from SEMM. The reset package will require a reboot to perform the unenroll operation. After the device has been unenrolled, you can verify the successful removal by ensuring that the Microsoft Surface Configuration Package item in Programs and Features (shown in Figure 5) is no longer present.
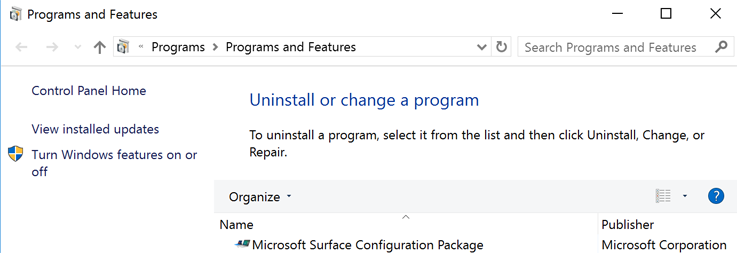
Figure 5. The presence of the Microsoft Surface Configuration Package item in Programs and Features indicates that the device is enrolled in SEMM
Unenroll a Surface device from SEMM with a Recovery Request
In some scenarios, a Surface UEFI reset package may not be a viable option to unenroll a Surface device from SEMM (for example, where Windows has become unusable). In these scenarios you can unenroll the device by using a Recovery Request generated from within Surface UEFI. The Recovery Request process can be initiated even on devices where you do not have the Surface UEFI password.
The Recovery Request process is initiated from Surface UEFI on the Surface device, approved with Microsoft Surface UEFI Configurator on another computer, and then completed in Surface UEFI. Like the reset package, approving a Recovery Request with Microsoft Surface UEFI Configurator requires access to the SEMM certificate that was used to enroll the Surface device.
To initiate a Recovery Request, follow these steps:
Boot the Surface device that is to be unenrolled from SEMM to Surface UEFI.
Type the Surface UEFI password if you are prompted to do so.
Click the Enterprise management page, as shown in Figure 6.
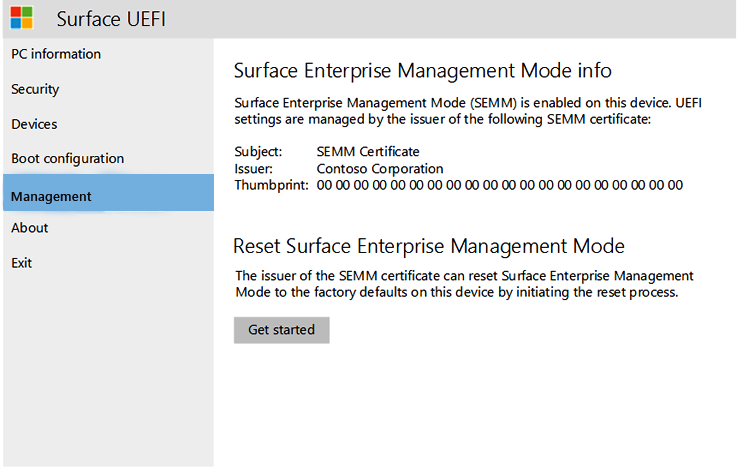
Figure 6. The Enterprise management page is displayed in Surface UEFI on devices enrolled in SEMM
Click or press Get Started.
Click or press Next to begin the Recovery Request process.
Note
A Recovery Request expires two hours after it is created. If a Recovery Request is not completed in this time, you will have to restart the Recovery Request process.
Select SEMM Certificate from the list of certificates displayed on the Choose a SEMM reset key page (shown in Figure 7), and then click or press Next.
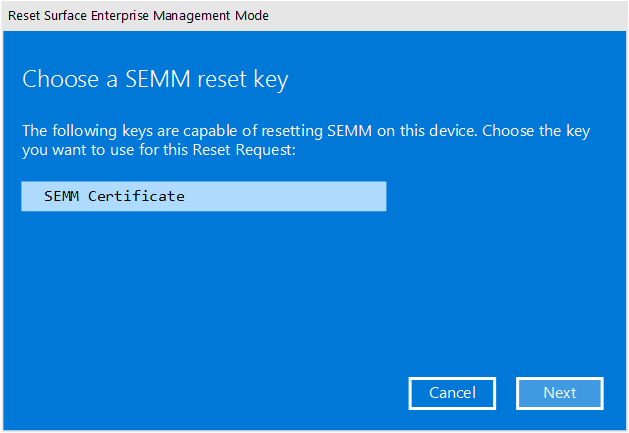
Figure 7. Choose SEMM Certificate for your Recovery Request (Reset Request)
On the Enter SEMM reset verification code page you can click the QR Code or Text buttons to display your Recovery Request (Reset Request) as shown in Figure 8, or the USB button to save your Recovery Request (Reset Request) as a file to a USB drive, as shown in Figure 9.
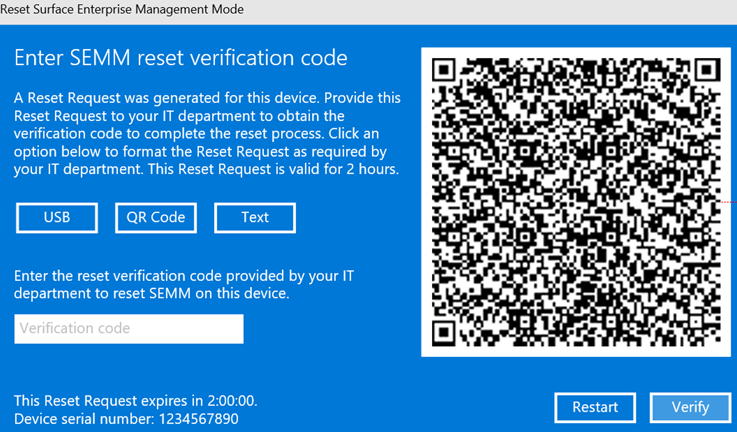
Figure 8. A Recovery Request (Reset Request) displayed as a QR Code
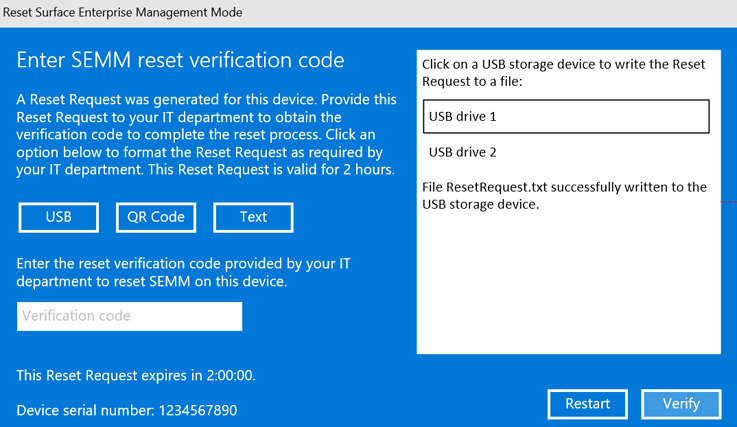
Figure 9. Save a Recovery Request (Reset Request) to a USB drive
- To use a QR Code Recovery Request (Reset Request), use a QR reader app on a mobile device to read the code. The QR reader app will translate the QR code into an alphanumeric string. You can then email or message that string to the administrator that will produce the reset verification code with Microsoft Surface UEFI Configurator.
- To use a Recovery Request (Reset Request) saved to a USB drive as a file, use the USB drive to transfer the file to the computer where Microsoft Surface UEFI Configurator will be used to produce the Reset Verification Code. The file can also be copied from the USB drive on another device to be emailed or transferred over the network.
- To use the Recovery Request (Reset Request) as text, simply type the text directly into Microsoft Surface UEFI Configurator.
Open Microsoft Surface UEFI Configurator from the Start menu on another computer.
Note
Microsoft Surface UEFI Configurator must run in an environment that is able to authenticate the certificate chain for the SEMM certificate.
Click Start.
Click Recovery Request, as shown in Figure 10.
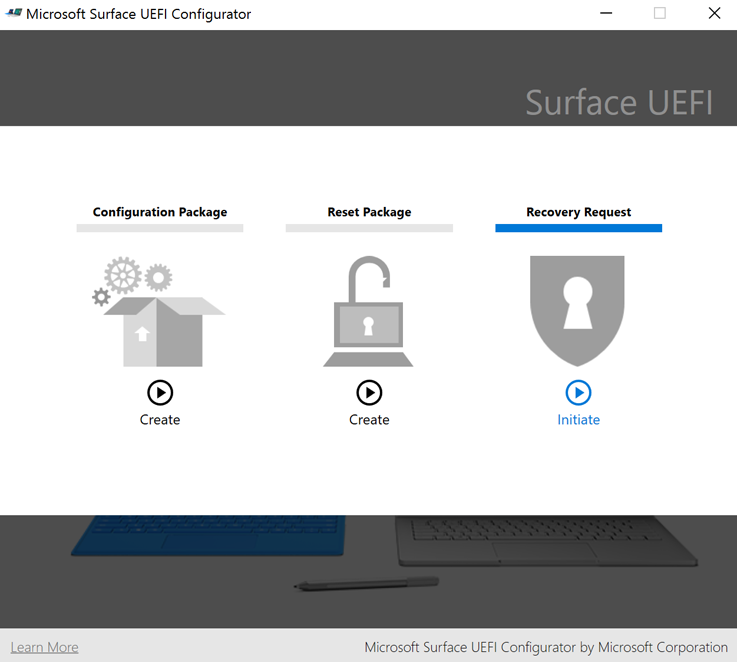
Figure 10. Click Recovery Request to begin the process to approve a Recovery Request
Click Certificate Protection to authenticate the Recovery Request with the SEMM certificate.
Browse to and select your SEMM certificate file, and then click OK.
When you are prompted to enter the certificate password as shown in Figure 11, type and confirm the password for the certificate file, and then click OK.
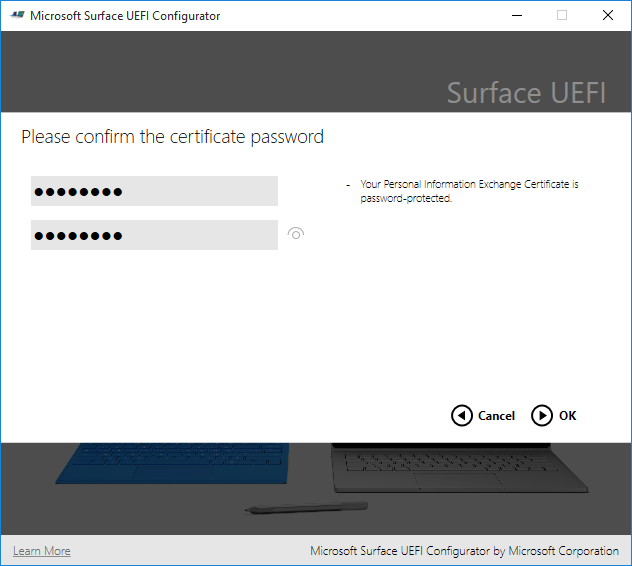
Figure 11. Type the password for the SEMM certificate
Click Next.
Enter the Recovery Request (Reset Request), and then click Generate to create a reset verification code (as shown in Figure 12).
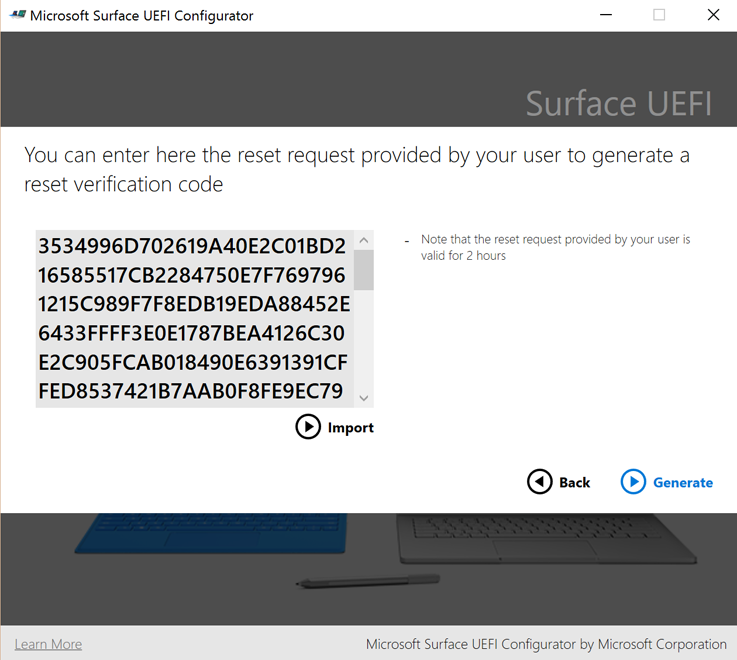
Figure 12. Enter the Recovery Request (Reset Request)
- If you displayed the Recovery Request (Reset Request) as text on the Surface device being reset, use the keyboard to type the Recovery Request (Reset Request) in the provided field.
- If you displayed the Recovery Request (Reset Request) as a QR Code and then used a messaging or email application to send the code to the computer with Microsoft Surface UEFI Configurator, copy and paste the code into the provided field.
- If you saved the Recovery Request (Reset Request) as a file to a USB drive, click the Import button, browse to and select the Recovery Request (Reset Request) file, and then click OK.
The reset verification code is displayed in Microsoft Surface UEFI Configurator, as shown in Figure 13.
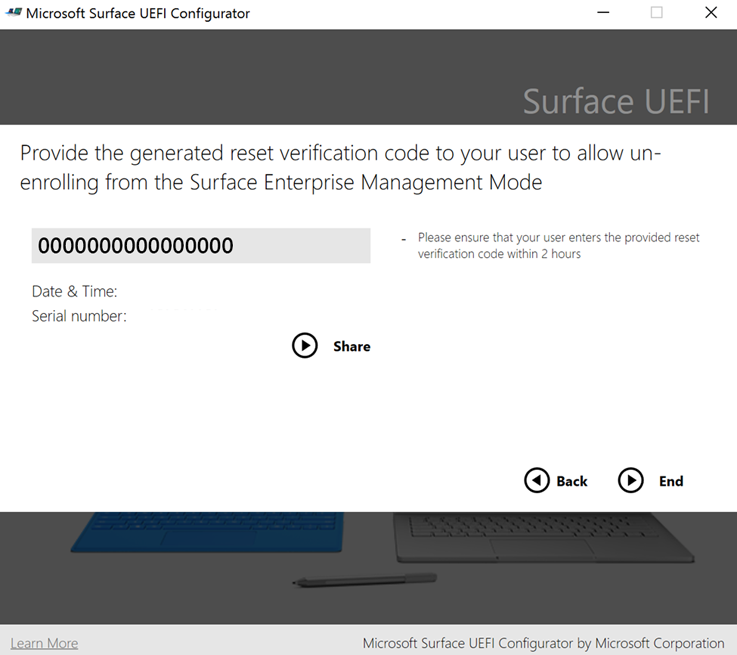
Figure 13. The reset verification code displayed in Microsoft Surface UEFI Configurator
- Click the Share button to send the reset verification code by email.
Enter the reset verification code in the provided field on the Surface device (shown in Figure 8), and then click or press Verify to reset the device and unenroll the device from SEMM.
Click or press Restart now on the SEMM reset successful page to complete the unenrollment from SEMM, as shown in Figure 14.
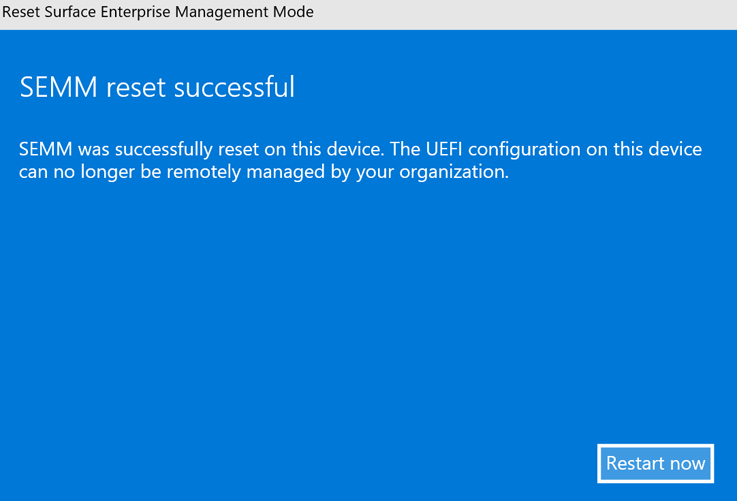
Figure 14. Successful unenrollment from SEMM
Click End in Microsoft Surface UEFI Configurator to complete the Recovery Request (Reset Request) process and close Microsoft Surface UEFI Configurator.
Feedback
Coming soon: Throughout 2024 we will be phasing out GitHub Issues as the feedback mechanism for content and replacing it with a new feedback system. For more information see: https://aka.ms/ContentUserFeedback.
Submit and view feedback for