Deploy Cloud Witness for a failover cluster
Applies to: Windows Server 2022, Windows Server 2019, Windows Server 2016
Cloud Witness is a type of failover cluster quorum witness that uses Microsoft Azure to provide a vote on cluster quorum. This article contains an overview of the Cloud Witness feature, which scenarios it supports, and instructions for how to configure a cloud witness for a failover cluster. For more information, see Set up a cluster witness.
What is Cloud Witness?
Before we begin, you should refresh your memory about what cluster quorums and quorum witnesses are by reading Understanding cluster and pool quorum.
Now, let's start by looking at an example configuration of a multi-site stretched failover cluster quorum for Windows Server, shown in the following diagram.
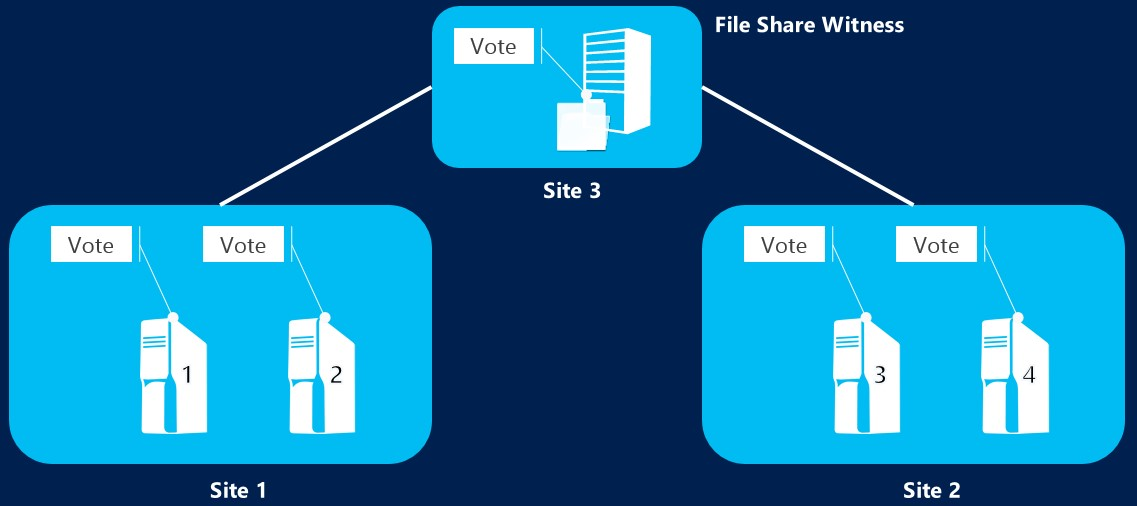
This example is a simplified configuration with two nodes in two on-site datacenters. In typical clusters, each node has one vote, a file share withness gives one extra vote to the quorum witness. This extra vote lets the cluster keep running even if one of the datacenters turns off. In the example, the cluster quorum has five possible votes, and only needs three votes to continue running.
However, you may notice that, in addition to the two datacenters, there's also a third datacenter called a file share witness. This datacenter is kept separate from the other two sites and hosts a file server that backs up the system file share. The file share witness functions as the quorum witness in this cluster quorum configuration, making sure the system still runs even if one of the datacenters unexpectedly shuts down.
Having a file share witness provides enough redundancy to keep your file server highly available. However, you should remember that hosting the file share witness on another server in a separate site requires setup, regular maintenance, and independent connectivity to the other sites.
Cloud Witness is different from traditional cluster quorum witness configurations because it uses an Azure VM in the cloud as the quorum witness instead of a physical datacenter. Cloud Witness uses Azure Blob Storage to read and write a blob file that the system uses as the deciding vote to achieve quorum. The following diagram shows an example configuration that uses Cloud Witness.
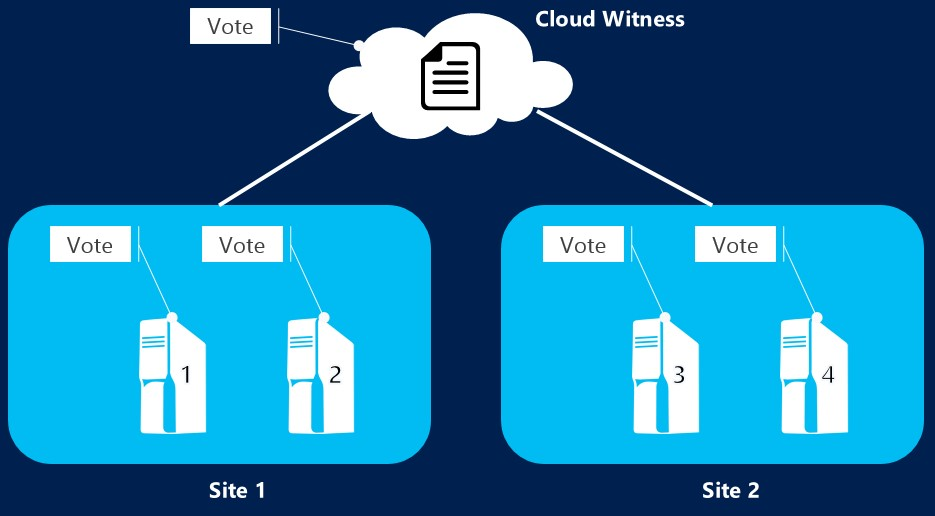
As you can see, Cloud Witness configurations don't require a third separate datacenter. Cloud Witness, like any other quorum witness, gets an extra vote and helps prevent total shutdowns if one of the other datacenters turns off. However, it doesn't need an extra site for storing the quorum witness. Cloud Witness also doesn't need the regular physical maintenance required for an on-site datacenter.
Along with redundancy, there are some other benefits to using the Cloud Witness feature:
You don't need to use a separate extra datacenter to achieve quorum.
Using Azure Blob Storage removes extra maintenance overhead normally required for hosting VMs in the public cloud.
You can use the same Azure Storage account for multiple clusters. The only requirements are that you use only one blob per cluster and name the blob file name after the cluster's unique ID.
Lower ongoing costs to your storage account because the blob file doesn't need much data and updates only when the cluster node state changes.
Azure comes with a built-in Cloud Witness resource type.
Prerequisites
You must have an Azure account with an active subscription and a valid Azure general-purpose storage account in order to configure Cloud Witness. This storage account is where Cloud Witness creates the msft-cloud-witness container to store the blob file required for voting arbitration.
Note
Cloud Witness isn't compatible with the following types of Azure storage accounts:
- Blob storage
- Azure Premium Storage
You can also use this account and the msft-cloud-witness container that Cloud Witness automatically creates to configure Cloud Witness across multiple different clusters. Each cluster has its own blob file that it stores in the container.
When creating your Azure Storage account, if the cluster you're configuring Cloud Witness for is on-premises or in Azure within the same Azure region and availability zones, select Locally-redundant storage (LRS) when configuring the Replication field. If your cluster is in the same Azure region but in different availability zones, select Zone-redundant storage (ZRS) instead.
You must use one of the following supported scenarios:
Disaster recovery for stretched multi-site clusters, as shown in What is Cloud Witness.
Failover clusters without shared storage, such as SQL Always On.
Failover clusters running inside a guest OS hosted in either the Microsoft Azure Virtual Machine role or any other public cloud.
Failover clusters made of VMs hosted in private clouds running inside of a guest OS.
Storage clusters with or without shared storage, such as Scale-out File Server clusters.
Small branch-office clusters, which are even two-node clusters.
We recommend you always configure a witness if you're using Windows Server 2012 R2 and later. Clusters in later versions of Windows Server automatically manage the witness vote and their nodes vote with Dynamic Quorum.
You also must make sure all firewalls between the failover cluster and Azure Storage account service allow traffic from port 443, also known as the HTTPS port. Cloud Witness uses the HTTPS REST interface for the Azure Storage service. Therefore, you must have port 443 open on all nodes in your failover cluster for Cloud Witness to work as intended.
When you create an Azure Storage account, Azure associates it with automatically generated primary and secondary access keys. When you set up Cloud Witness for the first time, we recommend you use the primary access key. After that, you can use either the primary or secondary access key.
Configure Cloud Witness as a quorum witness for your cluster
You can configure Cloud Witness using the Quorum Configuration setup workflow built into the Failover Cluster Manager application or by using PowerShell.
To use the Quorum Configuration setup workflow to configure Cloud Witness:
Open Failover Cluster Manager.
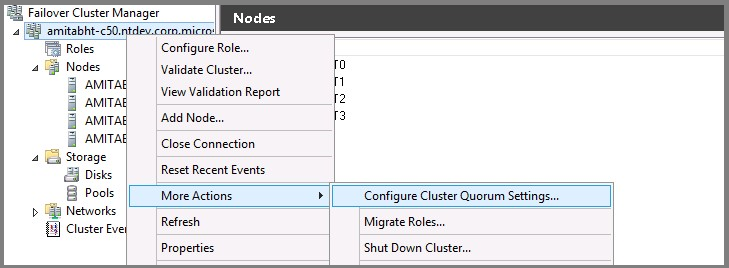
Right-click the name of your cluster.
Go to More Actions > Configure Cluster Quorum Settings, as shown in the following screenshot to launch the Configure Cluster Quorum workflow.
On the Select Quorum Configurations page, select Select the quorum witness.
On the Select Quorum Witness page, select Configure a cloud witness.
On the Configure Cloud Witness page, enter the following information:
Your Azure Storage account name.
The access key associated with your storage account.
If you're creating a cloud witness for the first time, use your primary access key.
If you're rotating your primary access key, then use the secondary access key instead.
Note
Instead of storing access keys directly, your failover cluster generates a Shared Access Security (SAS) token to securely store instead. The token is only valid as long as the access key it's associated with remains valid. When you rotate the primary access key, you must update the cloud witnesses on all clusters using that storage account with the secondary key before you can regenerate the primary key.
Optionally, you can enter the name of another existing server into the Endpoint server name field if you plan to use a different Azure service endpoint for your cloud witness, such as Azure China.
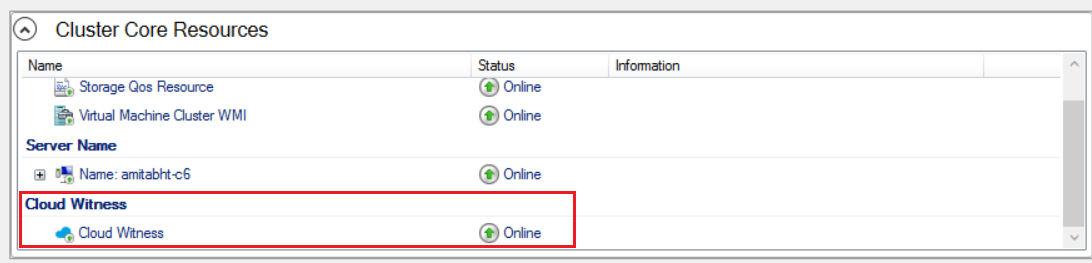
If configuration is successful, you should be able to see your new Cloud Witness in the Failover Cluster Manager accordion menu, as shown in the following screenshot.
Proxy considerations with Cloud Witness
Cloud Witness uses HTTPS (default port 443) to establish outbound communication with the Azure blob service. Azure uses .core.windows.net as the endpoint. You need to ensure that this endpoint is included in any firewall allow lists you're using between the cluster and Azure Storage. If a proxy is required to reach Azure Storage, configure Windows HTTP services (WinHTTP) with the required proxy settings. Failover cluster utilizes WinHTTP for HTTPS communication.
To use the Netsh command to configure a default proxy server, follow these steps:
Note
- This will change the default proxy configuration for WinHTTP. Any application, including Windows services, that use WinHTTP may be affected.
Open an elevated command line:
- Go to Start and type cmd.
- Right-click Command prompt and select Run as administrator.
Enter the following command and press Enter:
netsh winhttp set proxy proxy-server="<ProxyServerName>:<port>" bypass-list="<HostsList>"For example:
netsh winhttp set proxy proxy-server="192.168.10.80:8080" bypass-list="<local>; *.contoso.com"
See Netsh Command Syntax, Contexts, and Formatting to learn more.
Related content
Feedback
Coming soon: Throughout 2024 we will be phasing out GitHub Issues as the feedback mechanism for content and replacing it with a new feedback system. For more information see: https://aka.ms/ContentUserFeedback.
Submit and view feedback for