Unenroll Surface devices from SEMM
This article describes how to unenroll a device from SEMM using the Surface IT Toolkit. When a Surface device is enrolled in Surface Enterprise Management Mode (SEMM), a certificate is stored in the firmware of that device. The presence of that certificate and the enrollment in SEMM prevent any unauthorized changes to Surface Unified Extensible Firmware Interface (UEFI) settings or options while the device is enrolled in SEMM. To restore control of Surface UEFI settings to the user, the Surface device must be unenrolled from SEMM, a process sometimes described as reset or recovery.
Warning
To unenroll a device from SEMM and restore user control of Surface UEFI settings, you must have the SEMM certificate that was used to enroll the device in SEMM. If this certificate becomes lost or corrupted, it is not possible to unenroll from SEMM. Back up and protect your SEMM certificate accordingly.
For more information about SEMM, see Microsoft Surface Enterprise Management Mode.
Unenroll a Surface device from SEMM with a Surface UEFI reset package
The Surface UEFI reset package is the primary method you use to unenroll a Surface device from SEMM. Like a Surface UEFI configuration package, the reset package is a Windows Installer (.msi) file that configures SEMM on the device. Unlike the configuration package, the reset package resets the Surface UEFI configuration on a Surface device to its default settings, remove the SEMM certificate, and unenroll the device from SEMM.
The Surface IT Toolkit generates a universal reset package that applies to all supported devices except Surface Go 2.
For Surface Go 2: To begin the process of creating a reset package, you need the serial number of the device you want to unenroll, and the SEMM certificate used to enroll the device. You can find the serial number of your Surface device on the PC information page of Surface UEFI, as shown in the following figure. This page is displayed even if Surface UEFI is password protected and the incorrect password is entered.

Note
To boot to Surface UEFI, press Volume Up and Power simultaneously while the device is off. Hold Volume Up until the Surface logo is displayed and the device begins to boot.
Unenroll a Surface device from SEMM with a Recovery Request
In some scenarios, a Surface UEFI reset package might not be a viable option to unenroll a Surface device from SEMM (for example, if Windows is unusable). In these scenarios, you can unenroll the device by using a Recovery Request generated from within Surface UEFI. The Recovery Request process can be initiated even on devices where you don't have the Surface UEFI password.
The Recovery Request process is initiated from Surface UEFI on the Surface device, approved with Surface UEFI Configurator on another computer, and then completed in Surface UEFI. Like the reset package, approving a Recovery Request with UEFI Configurator requires access to the SEMM certificate that was used to enroll the Surface device.
To initiate a Recovery Request, follow these steps:
Boot the Surface device that is to be unenrolled from SEMM to Surface UEFI.
Type the Surface UEFI password if you're prompted to do so.
Select the Management page. You might need to select Configure to display the SEMM and Reset info, as shown in the following figure.

Select Get Started.
Select Next to begin the Recovery Request process.
Note
A Recovery Request expires two hours after it is created. If a Recovery Request is not completed in this time, you will have to restart the Recovery Request process.
Select SEMM Certificate from the list of certificates displayed on the Choose a SEMM reset key page and then Select Next.

On the Enter SEMM reset verification code page, you can select the QR Code or Text buttons to display your Recovery Request (Reset Request) or the USB button to save your Recovery Request (Reset Request) as a file to a USB drive.


- To use a QR Code Recovery Request (Reset Request), use a QR reader app on a mobile device to read the code. The QR reader app translates the QR code into an alphanumeric string. You can then email or message that string to the administrator that produces the reset verification code with UEFI Configurator.
- To use a Recovery Request (Reset Request) saved to a USB drive as a file, use the USB drive to transfer the file to your admin computer where UEFI Configurator will be used to produce the Reset Verification Code. The file can also be copied from the USB drive on another device to be emailed or transferred over the network.
- To use the Recovery Request (Reset Request) as text, type the text directly into UEFI Configurator.
To create a Surface UEFI reset request:
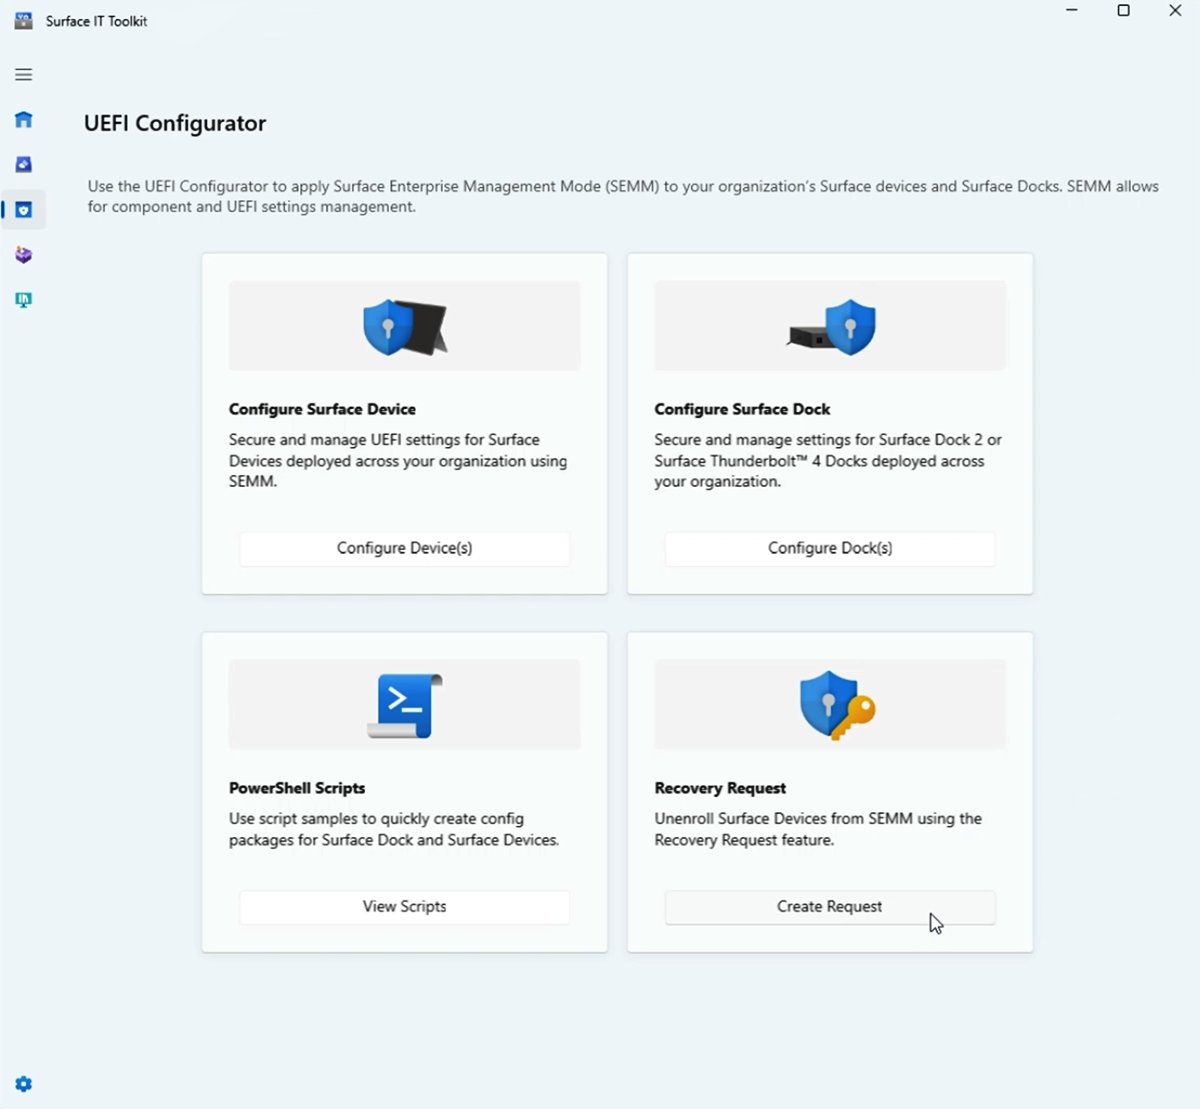
Open the Surface IT Toolkit and go to the UEFI Configurator section.
Select the Recovery Request to initiate the unenrollment process for Surface devices from SEMM (Surface Enterprise Management Mode).
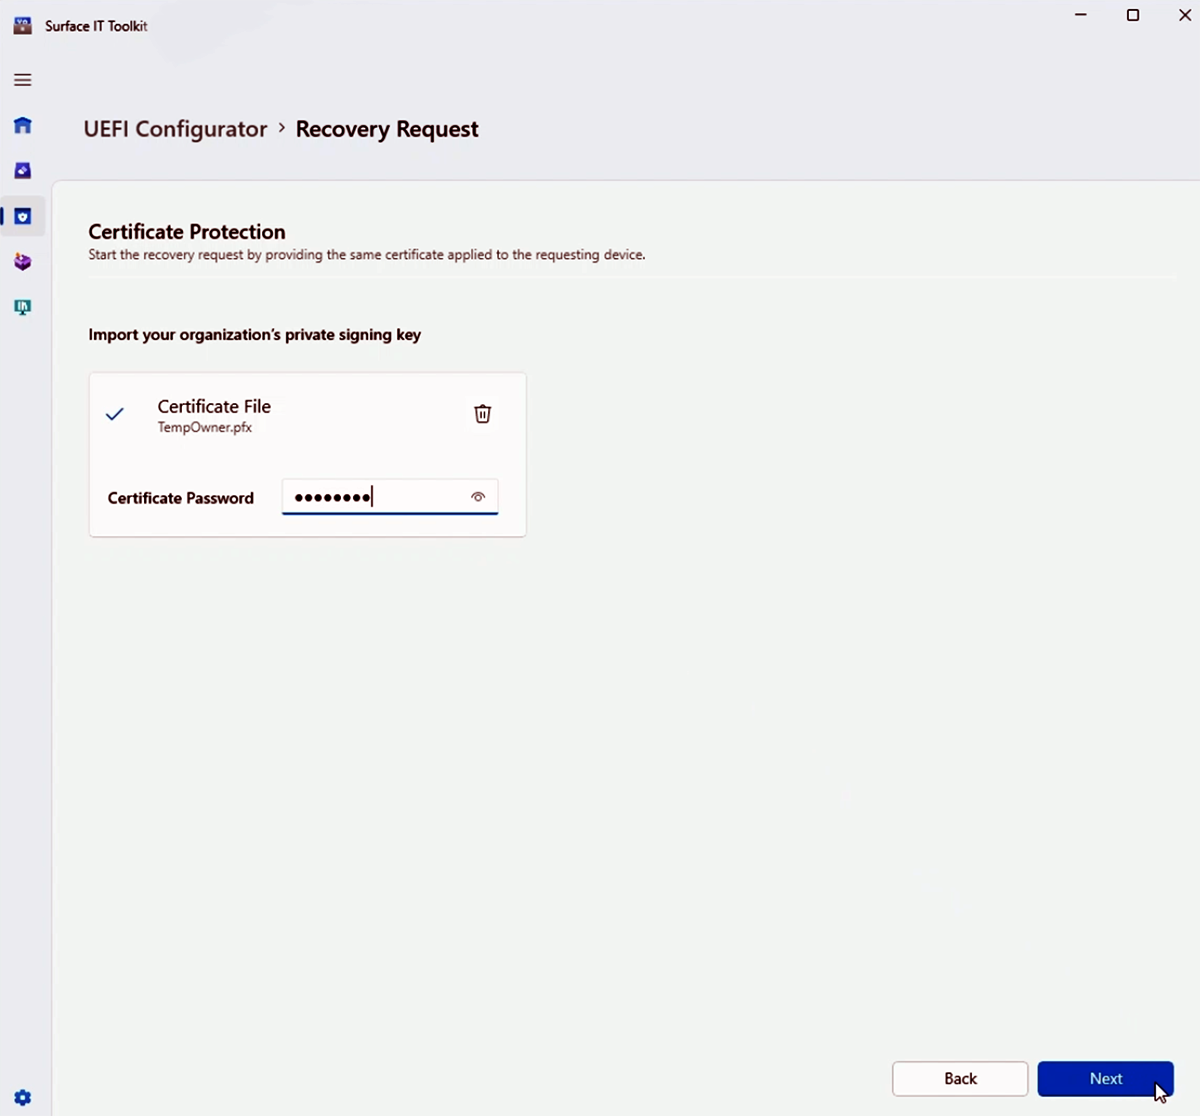
In the Certificate Protection section, import your organization's private signing key by selecting the Certificate File and entering the associated Certificate Password. This certificate should match the one applied to the requesting device.
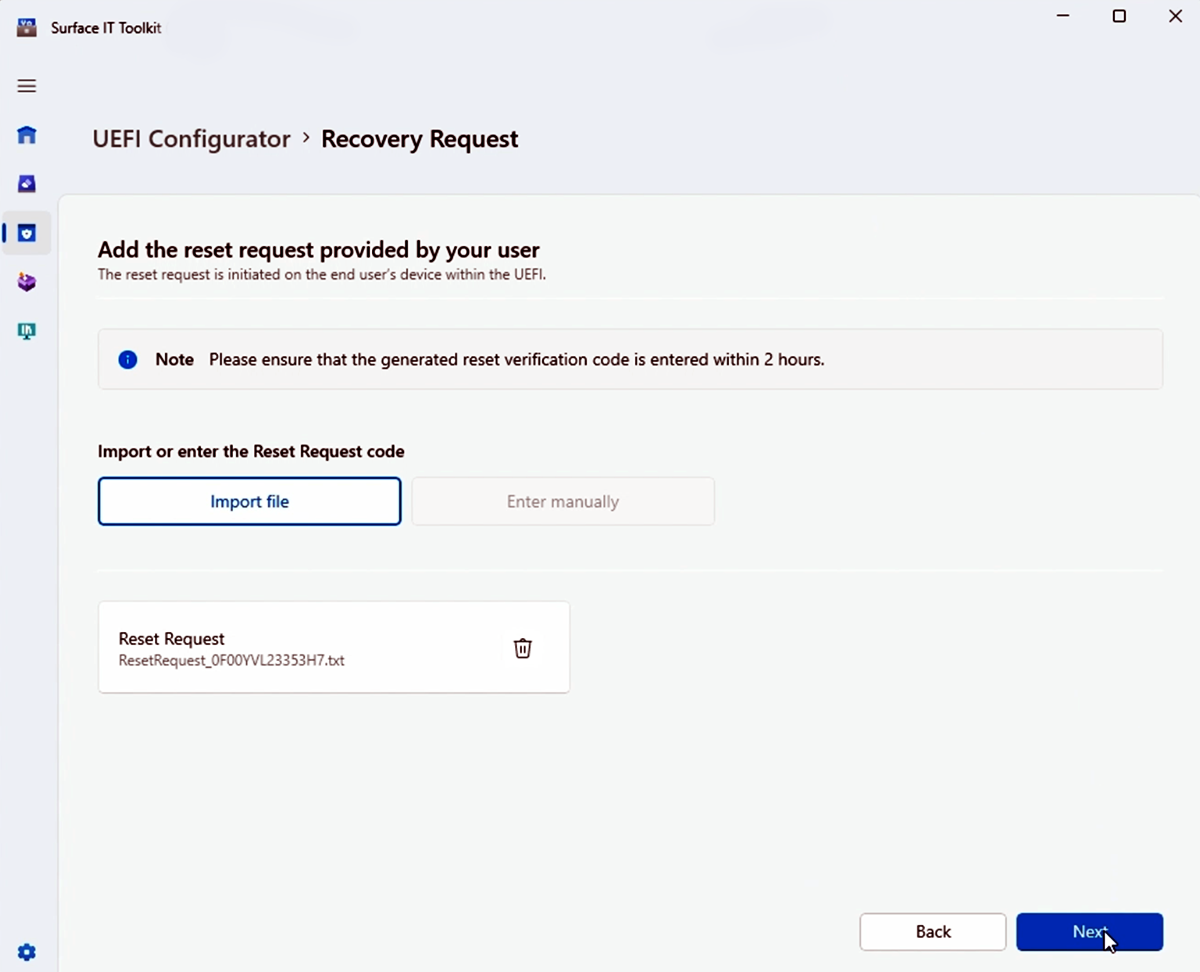
Select Next to proceed to the Add the reset request provided by your user section.
Import or enter the Reset Request code. This can either be done by importing the file directly or entering the code manually, which the end user's device generates within the UEFI.
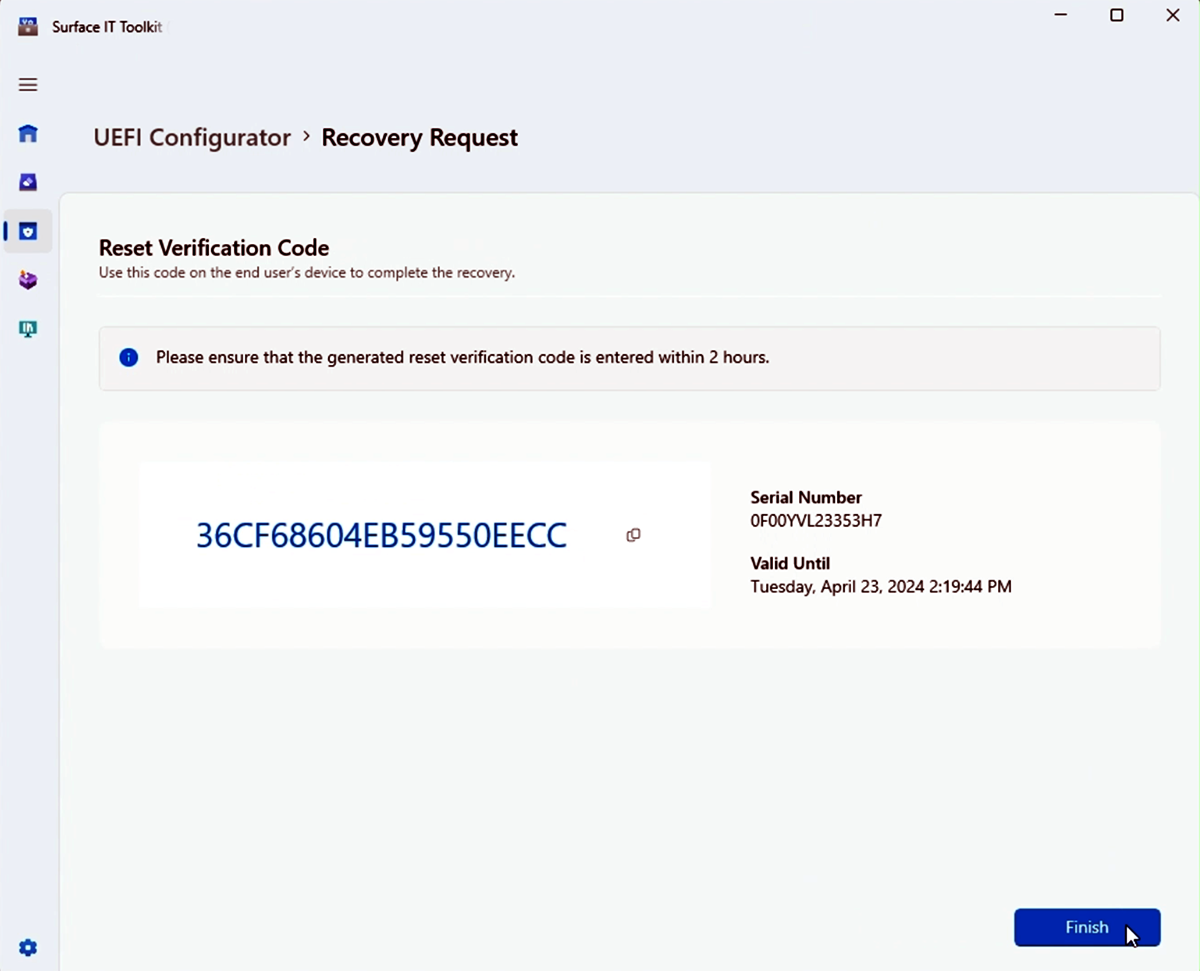
Once the code is imported or entered, select Next to generate the Reset Verification Code.
Provide the generated Reset Verification Code to the end user to complete the recovery process on their device. The verification code is time-sensitive and should be used within 2 hours for it to be valid.
Select Finish to complete the Recovery Request process.
Direct the user to enter the reset verification code in the provided field on the Surface device and then Select Verify to reset the device and unenroll the device from SEMM.
Select Restart now on the SEMM reset successful page to complete the unenrollment from SEMM, as shown in the following figure.

Learn more
Feedback
Coming soon: Throughout 2024 we will be phasing out GitHub Issues as the feedback mechanism for content and replacing it with a new feedback system. For more information see: https://aka.ms/ContentUserFeedback.
Submit and view feedback for