Migrate Surface Hub 2S to Microsoft Teams Rooms on Windows
If you have a Surface Hub 2S, you can migrate it to run the Microsoft Teams Rooms on Windows experience. This enables Surface Hub 2S devices to run the same Windows 11 software platform shipping on new Surface Hub 3 devices.
Background
Begin the migration process via the downloadable Surface Hub 2S OS Migration Launcher - Microsoft Teams Rooms app, which you can install directly on a Surface Hub 2S or remotely via Microsoft Intune or other cloud management tools.
Note
The Migration Launcher app is designed exclusively for Surface Hub 2S devices transitioning from the Windows 10 Team edition operating system to the Microsoft Teams Rooms on Windows experience. It triggers the migration process under specific prerequisite conditions and has no other functionality or user interface.
Tip
Customers can take advantage of streamlined remotely driven deployment after migrating their Surface Hub 2S devices to the Microsoft Teams on Windows platform. As announced at Enterprise Connect 2024, support for Windows Autopilot and Auto-login of Teams Rooms on Windows is now broadly available in Public Preview. Learn more in Deploy Surface Hub with Windows Autopilot & Auto-login of Teams Rooms.
Migration Launcher app deletes OS and data
Caution
Do not install the Migration Launcher app on Surface Hub 2S unless you are prepared for an immediate migration to Microsoft Teams Rooms on Windows experience.
Use of the Migration Launcher app on Surface Hub 2S involves significant changes to the operating system and stored data. Here are key points to understand before proceeding with the migration process:
- Removes the Windows 10 Team edition OS: Migration completely eliminates the Windows 10 Team edition operating system preinstalled on the Surface Hub 2S.
- Requires consent for data and configuration removal: By installing and initiating the Migration Launcher app on a Surface Hub 2S, you agree to the complete removal of the Windows 10 Team edition OS. This includes uninstalling and erasing all accounts, data, and existing configurations.
- Excludes first-generation Surface Hubs: The Microsoft Teams Rooms on Windows experience and the Migration Launcher app don't support or affect first-generation Surface Hubs (Surface Hub v1).
- Requires significant download and storage space: The migration process necessitates downloading approximately 30 GB of data and needs sufficient on-system storage to establish a temporary partition.
- Increases energy consumption: Switching to the Microsoft Teams Rooms on Windows experience leads to higher energy usage due to adjustments in sleep state and power management settings.
Prerequisites
Ensure Surface Hub 2S is connected to the Internet and has the latest Windows Updates, including Microsoft Corporation - System Hardware Update - 2/8/2024.
To get all the required updates, sign in with Admin credentials, go to All apps > Settings > Update and Security > Windows Update, and install all updates.
Repeat the update retrieval process until you install all the available updates.
Once updated, confirm that the UEFI version is 699.845.768.0 or later.
If you're unable to check for Windows updates locally (for example, in remote admin scenarios), you can verify the OS version via Microsoft Intune admin center or other mobile device management (MDM) solutions.
You can also check by validating that Windows 10 OS Build 19045.4123 or later is present on the system.
Validate that your network can handle a 30 GB download.
Ensure the network you're using doesn't have any other firewalls, blockages, or limitations that would otherwise prevent the download and installation of software onto the Surface Hub 2S devices you intend to migrate.
Confirm IT allows network access to required sites: *.devices.microsoft.com and download.microsoft.com. On a separate PC, open a command line or console and enter the following commands:
ping devices.microsoft.comping download.microsoft.com
Surface Hub 3 Pack option
Tip
Alternatively, if you don't wish to migrate your Surface Hub 2S, you can purchase the Surface Hub 3 Pack compute cartridge, which lets you swap out your existing Surface Hub 2S cartridge and instantly convert your Surface Hub 2S to a Surface Hub 3. To learn more, see Install and manage Surface Hub 3 Pack.
Note
Support for Windows 10 Team edition on Surface Hub, based on Windows 10 version 22H2, is scheduled to end on October 14, 2025.
Optional: Streamline post-migration deployment with Windows Autopilot and Teams Rooms Auto-Login
Whether you initiate the migration process manually on a Surface Hub 2S or remotely via Intune, it's advantageous to set the stage for the device to autonomously complete its deployment post-migration, utilizing Windows Autopilot in conjunction with Auto-Login of Teams Rooms. This approach is particularly beneficial for customers triggering migration remotely, as it facilitates a fully remote, end-to-end process spanning migration to the Teams Rooms on Windows experience to the subsequent deployment within your organization.
For detailed guidance on enrolling your Surface Hub in Autopilot and Auto-login of Teams Rooms, see Deploy Surface Hub with Windows Autopilot & Auto-login of Teams Rooms.
Tip
For an optimal experience, it's recommended to configure Autopilot and Auto-login of Teams Rooms before starting the migration process. This preparation ensures that seamless deployment is primed and ready to begin when migration is complete.
Install Migration Launcher app to trigger a migration
Choose one of the following options:
- Manually install Migration Launcher app on Surface Hub 2S. Designed for migrating individual Surface Hub 2S devices.
- Remotely install Migration Launcher app via Intune. Designed for migrating multiple select Surface Hub 2S devices remotely.
Manually install Migration Launcher app on Surface Hub 2S
Sign back in as admin. Go to Surface Hub > Apps & features > Open Store.
Search for Surface Hub 2S OS Migration Launcher – Microsoft Teams Rooms and select Get.
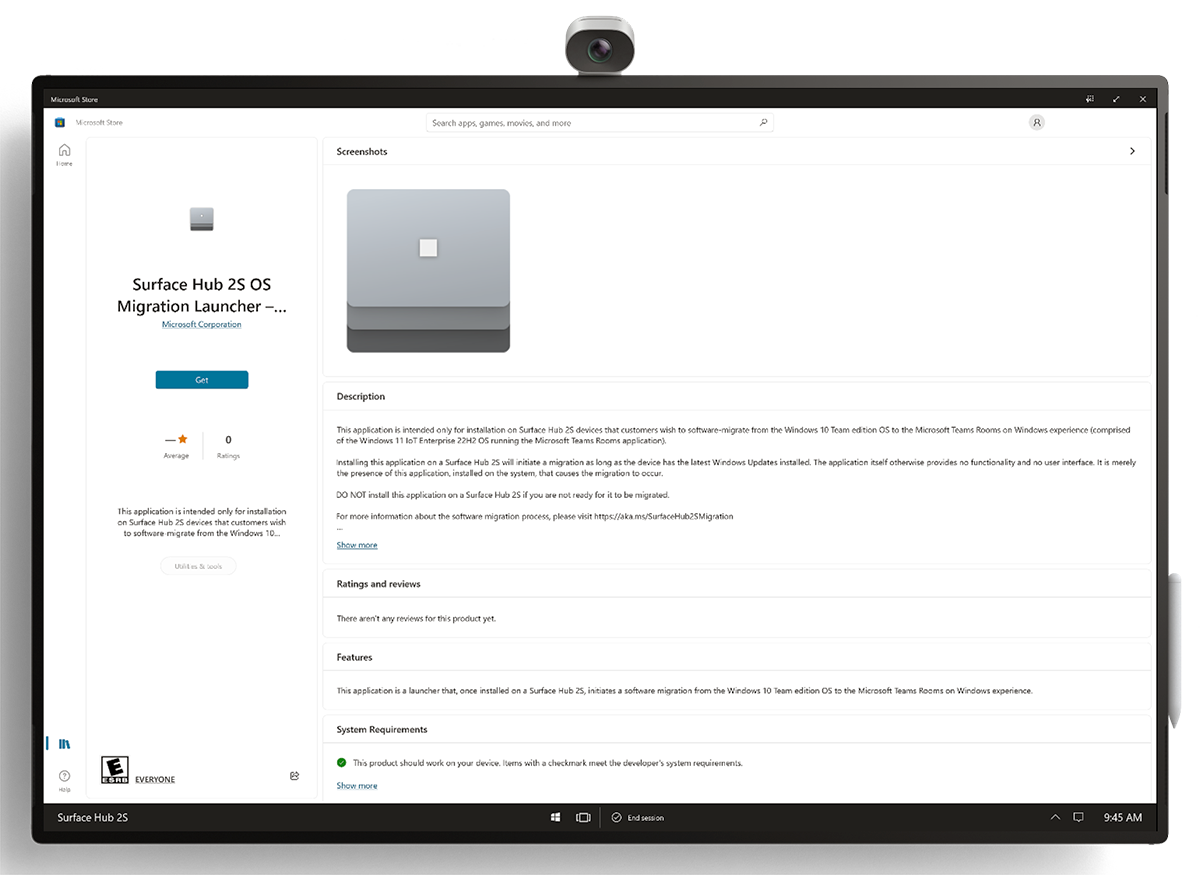
To validate successful installation, select All apps and look for Surface Hub 2S OS Migration Launcher.
Once you see the Migration Launcher in the app list, the migration proceeds automatically upon restarting the Windows 10 Team edition OS. You can either manually restart Surface Hub 2S or wait until the system automatically restarts during the default nightly maintenance window.
Tip
After this initial restart, do not interfere with the system; even though it may appear nothing is happening and you still see the same experience, the migration proceeds independently after completing all necessary backend processes (including downloading and unzipping the new Teams Rooms on Windows image).
Typical migration time is around 90 minutes from restart after installing the Migration Launcher app, but the length can vary depending on many characteristics, including customer network bandwidth and related factors.
When migration is complete, the device displays the Windows first-time setup program, also known as Out of the Box Experience (OOBE). To learn more, see First-time setup for Surface Hub 3.
Remotely install Migration Launcher app via Intune
Tip
If you are remotely triggering migration with the following steps, you may wish to consider setting up seamless post-migration deployment as well. To learn more, see the earlier section on this page: Streamline post-migration deployment with Windows Autopilot and Teams Rooms Auto-Login.
Summary
- Ensure your Surface Hub 2S devices are fully updated and enrolled in Intune.
- Add Surface Hub 2S devices to a Device group.
- Associate Store for Business account with Intune.
- Download Migration Launcher app from the Microsoft Store for Business.
- Configure Microsoft Store for Business to display offline apps
- Deploy Migration Launcher app via Intune.
Note
These app deployment operations use the EnterpriseModernAppManagement CSP and can also be executed with SyncML commands from another MDM solution.
Ensure your Surface Hub 2S devices are fully updated and enrolled in Intune
To verify enrollment, sign into Intune admin center, go to Devices > All devices, and look for the names of your target devices.
Check that the OS version for the target devices meets the prerequisites listed earlier, specifically OS version 19045.4123 or later.

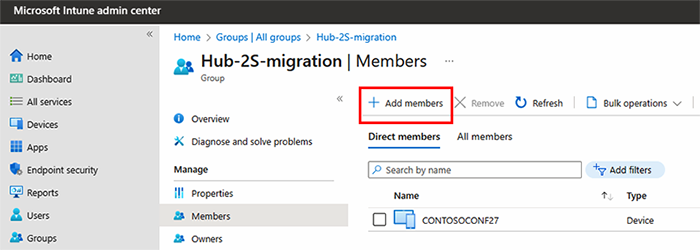
Add Surface Hub 2S devices to a Device group
Warning
Any devices in the group targeted for Migration Launcher app deployment are migrated as soon as the app has deployed. To avoid unintended behavior, we recommend against using Dynamic Groups, and we encourage you to validate that only your intended devices are included in the group you selected.
Sign in to the Microsoft Intune admin center.
Select Groups and then select New group.
In the Group type field, choose Security.
Enter a Group name and Group description for the new group.
In the Membership type field, choose Assigned.
Select Create to create the new group.
Open the Group, select Members > Add members and add the Surface Hub 2S devices you're targeting for migration.
Associate store account with Intune
Before you enable synchronization in the Intune admin center, you must configure your store account to use Intune as a management tool:
- Ensure that you sign into the Microsoft Store for Business using the same tenant account you use to sign into Intune.
- In the Business Store, choose Manage, select Settings, and choose Distribute.
- If you don't already have Intune available as a mobile device management tool, choose Add management tool to add Microsoft Intune. If you don't have Microsoft Intune activated as your mobile device management tool, select Microsoft Intune > Activate.
Tip
Activate Microsoft Intune, not Microsoft Intune Enrollment.
Download Migration Launcher app
Download the migration launcher app package from Microsoft Store for Business.
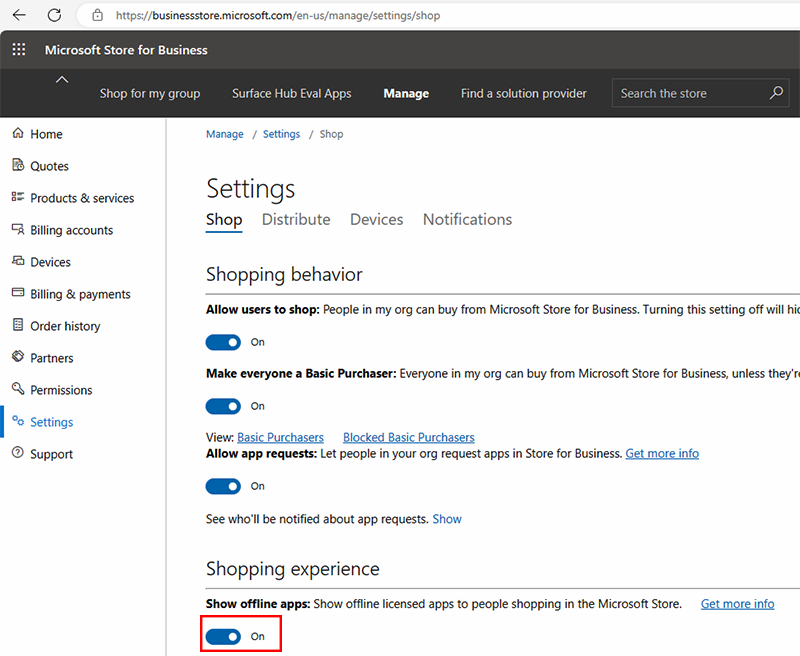
Configure Microsoft Store for Business to display offline apps
Sign in to the Microsoft Store for Business.
Select Manage > Shop settings and under Shopping experience, ensure that Show offline apps is enabled.
Get offline-licensed app package for Migration Launcher
Shop for the app and add it to your group inventory. Select Shop for my group and search for Surface Hub 2S OS Migration Launcher – Microsoft Teams Rooms. Or go directly to the Migration app page in the Microsoft Store for Business.
On the app page, for License type, select Offline > Get the app. This adds the app to your Microsoft Store for Business group inventory. After you see a "toast message" indicating you successfully added the app to your library, select Manage, as shown in the following figure. (The Manage button replaces the Get the app button).
After you select Manage, the page listing for the Migration Launcher app is displayed. Wait a few moments for the spinner to complete and the Download portion of the resulting page to appear.
Under Download package for offline use, select your desired architecture (X64, X86, or ARM processor). We recommend using x86.
Under Package details, choose Download to initiate the download of the MsixBundle for the package identity name: Microsoft.SurfaceHUBMTROSTriggerApp.
- If you receive an error indicating the downloadable file is unsafe, select Keep.
- If further prompted in the Microsoft Edge browser that This file can't be downloaded securely, select Keep anyway.
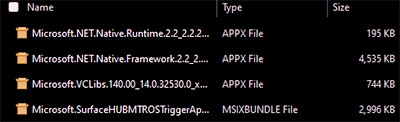
Under Required frameworks, download all three of the required frameworks on the page:
- Microsoft.VCLibs.140.00_14.0.32530.0_x86__8wekyb3d8bbwe
- Microsoft.NET.Native.Framework.2.2_2.2.29512.0_x86__8wekyb3d8bbwe
- Microsoft.NET.Native.Runtime.2.2_2.2.28604.0_x86__8wekyb3d8bbwe
If you receive an error indicating the downloadable files are unsafe, select Keep and Keep anyway.
You should now have four files (one MSIXBUNDLE File and three APPX Files) downloaded to your local computer and ready for the next step.
Deploy Migration Launcher app via Intune
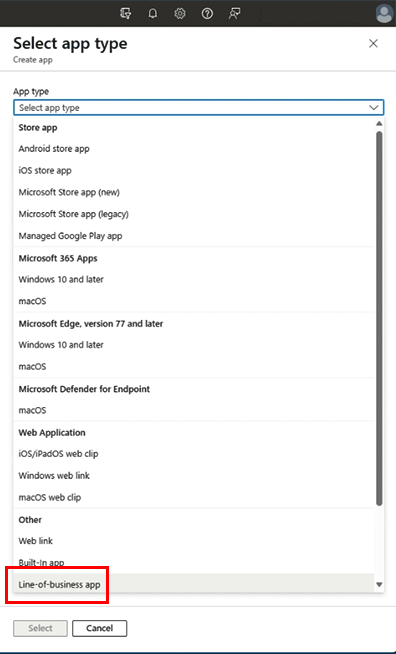
Sign in to Intune Admin Center and go to Apps > All apps > Add. Under App type, select Line-of-business app.
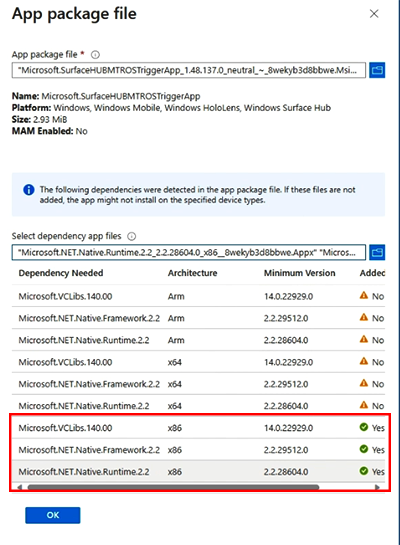
Configure app information on the Add App page. Under the App information section, choose Select app package file. In the flyout pane, select the blue folder icon under the App package file and navigate to select and upload your LOB app package, in this case, the Surface Hub 2S OS Migration Launcher – Microsoft Teams Rooms MSIXBUNDLE file downloaded in the earlier section.
Select Dependency app files and choose the blue folder icon to select and upload all three dependencies. The inventory of required files displays a green check box to indicate that you have all the required files uploaded.
Tip
You only need to ensure the three check box icons appear for your specified architecture
Select OK after you add all the necessary files.
Under App information, select Next.
Assign app
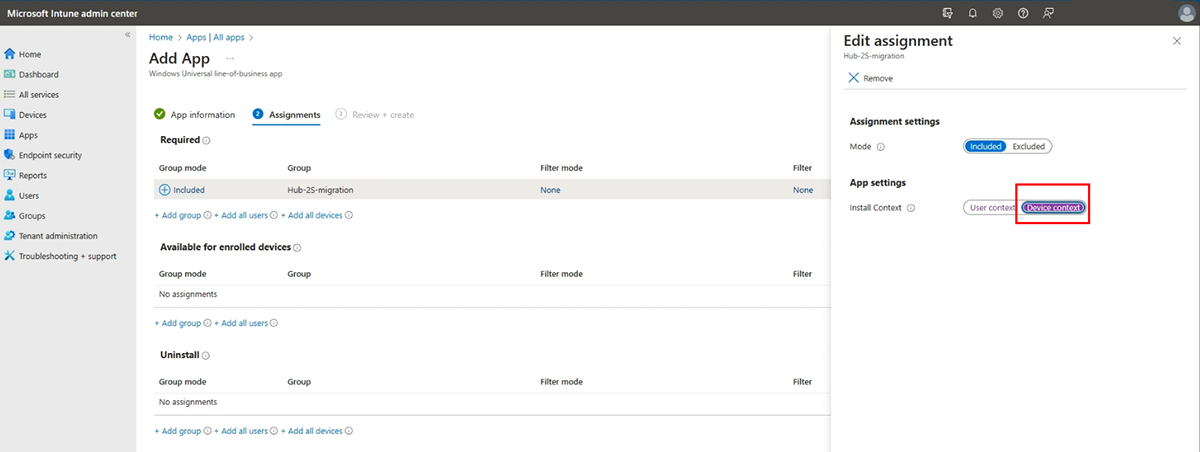
Under the Assignments tab, specify how the app is deployed to your Surface Hub 2S devices. You can make the app available for enrolled devices or assign it as required.
Under Required > Group mode, select Add group and add your intended Device group.
Under Required Group mode > Install Context, select User context link, and in the flyout pane, change the App settings toggle to ensure Device context is selected and then select OK.
Select Next.
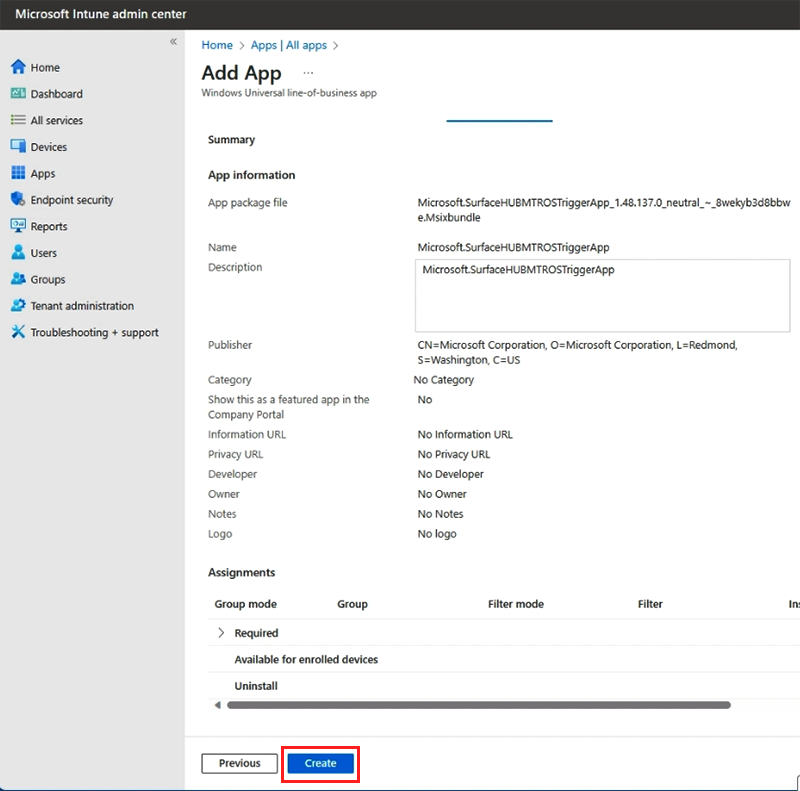
Review and create
Under Review + create, review all settings and configurations. Select Create to deploy the app.
This might take a few minutes, depending on network connectivity or other factors. You can check the upload status under the Notifications tray.
Monitor deployment of Migration Launcher app
After deploying the Migration Launcher app, monitor its deployment status in Intune.
To see the status of the deployment, navigate to the app in Intune and check the Overview and Assignments tabs. Check the Device context status, not the User.
Note
Several factors contribute to how long it takes for the app to finish deployment and installation on the target devices, including device power/sleep state, sync cadence/status with Intune, and related factors. Continue to monitor Intune status for indications of successful app deployment.
Once the app is deployed, the next restart initiates migration, which - in this remote deployment scenario - is likely to be the automatic restart as part of the nightly maintenance window. Similar to the manual app deployment scenario, the migration process typically takes about 90 minutes after this restart (but many factors can impact migration time, as explained earlier, with a test example exceeding 5 hours on a slower network). Customers must test and validate sequences relative to their unique infrastructure and management approaches.
When migration is complete, the device displays the Windows first-time setup program, also known as Out of the Box Experience (OOBE). To learn more, see First-time setup for Surface Hub 3.
Tip
If you configured seamless deployment with Autopilot, the Windows first-time setup program automatically proceeds according to the Autopilot configuration you've established. Once complete, you can see the device registered in Intune and appearing online in the Teams Rooms Management Portal. To ensure the device is properly online and visible in the Teams Admin Center, refer to the following section.
Manual removal of migrated Surface Hub devices from Teams Admin Center (Surface Hubs Legacy tab)
After migrating your Surface Hub 2S to the Microsoft Teams Rooms on Windows platform, you need to manually remove the device listing from the "Surface Hubs (Legacy)" section of Teams Admin Center. This will thereafter enable the device to show up properly under the "Teams Rooms on Windows" section and enable accurate device management.
- Navigate to Teams Admin Center:
- Open your web browser and go to the Teams Admin Center.
- Sign in with your admin credentials.
- Access the Surface Hubs (Legacy) Tab:
- In the Teams Admin Center, select Teams devices > Surface Hubs (Legacy).
- Manually remove the migrated device:
- Locate the row corresponding to the migrated Surface Hub device and select the device.
- Select Remove to manually remove the device's row from the list.
- Verification:
- Refresh the page or navigate away and then back to the Surface Hubs (Legacy) tab to ensure that the device has been successfully removed.
- Verify that the migrated device is now correctly managed under the appropriate tab for Teams Rooms devices, if applicable. This may take up to 12 hours to happen, but will happen automatically.
Manual cleanup of stale Intune device objects for migrated Surface Hub devices
If you've previously registered a Surface Hub 2S in Intune before transitioning it to the Microsoft Teams Rooms on Windows platform, you'll likely encounter what's referred to as a "stale" device record. This occurs when the original device object in Intune remains unchanged, even as a new device record is generated post-migration to the Teams Rooms platform. Although this stale record does not interfere with the Intune-based management of the now-migrated device, it's advisable to remove these outdated entries to maintain optimal directory cleanliness.
- Access Microsoft Intune Admin Center: Sign in with your admin credentials.
- Navigate to Devices: Use the left-hand navigation pane and select the Devices tab.
- Locate All Devices: Within the Overview section, select All devices to view the entire list of managed devices.
- Identify and select the stale device object: Look for the device object that needs removal. You can identify the stale entry based on your established device naming conventions. Typically, the stale record displays an OS build number of 19045, indicative of the Windows 10 Team edition, as opposed to the updated OS build number 22621, which signifies the Windows 11 IoT Enterprise version 22H2, post-migration.
- Note: Pay close attention to the OS build numbers to accurately distinguish between pre-migration and post-migration device records.
- Delete the stale record: On the selected device object’s page, navigate to the top menu and select Delete to remove the stale device record from Intune.
Post-migration configuration
Review the following articles for recommended next steps:
- Get started with Surface Hub 3
- First-time setup for Surface Hub 3
- Surface Hub 3 security best practices
- Install Windows Bloom wallpaper on Surface Hub 3
Troubleshooting
Quick checks
- Verify that Surface Hub 2S is fully updated and otherwise meets the prerequisites described earlier. To learn more, see Troubleshoot Surface Hub not Updating
- Ensure the Migration Launcher app is installed on target Surface Hub 2S devices.
- Ensure the system restarts after installing the Migration Launcher app.
Event logs
If migration doesn't proceed after 24 hours, check system event logs for possible errors, including a potential issue related to available storage space.
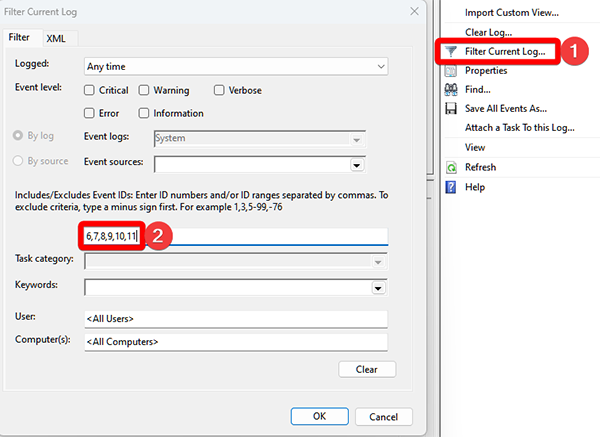
To open Event logs, on Surface Hub go to Settings > Update & security > Logs > Event Viewer. Event logs are located under Windows Logs > System.
You can filter for the following Event IDs, as shown in the following figure: 6,7,8,9,10,11. Select the System log > Filter Current Log:
Monitoring Surface Hub migration events
When overseeing the migration process on Surface Hub 2S, pay attention to specific events logged by the SurfaceHubMonitor source. Event IDs 6-11 indicate different stages and potential failures in the migration process.
Key Event IDs
| Event | Description |
|---|---|
| Event ID 6: OS migration process started | This event is logged as the first step after the Monitor Service verifies the app's presence and the UEFI version. It signifies the start of the migration process. |
| Event ID 7: Failed to verify migration app signature for OS migration | In a migration, Windows checks the digital signature of the Surface Hub 2S OS Migration Launcher - Microsoft Teams Rooms app. Causes of this error include corrupted system files, an outdated or corrupted certificate store, or network issues (if the verification process involves checking with an online certificate authority). To address this problem: - Ensure your current version of Windows is up to date with all the latest patches and updates, as described in the Prerequisites section of this page. - Ensure your internet connection is stable, as the verification process might require contacting external servers. |
| Event ID 8: UEFI firmware not updated to support OS migration | - Confirm that the UEFI version is 699.845.768.0 or later, as described in the Prerequisites section of this page. You can verify the UEFI version via the Surface app. |
| Event ID 9: Disk space is insufficient for OS migration | Migration requires a minimum of 30 GB of free space. If this event occurs, delete unnecessary files, uninstall unused applications, or move data to an external storage device. |
| Event ID 10: OS image download failed | If this event occurs, the system attempts the download again. This can lead to a sequence of Event ID 6 followed by Event ID 10 if the issue persists. Common causes: - Inability to access the download site. - Connection drops during download, exhausting all retry attempts. - Insufficient disk space or inaccessible file location for the download. Additional notes: - The system checks for sufficient disk space and the creation of the migration partition at every boot. It fails to download if conditions aren't met. - Be aware of timing issues. If the download isn't complete before a scheduled or manual reboot, the download restarts, potentially leading to prolonged migration. |
| Event ID 11: MTR license key retrieval failed | This event occurs after repartitioning and downloading the OS image. If the OS image download isn't successful, the system fails to proceed to the key retrieval stage. |
Best practices for a smooth migration
Avoid Frequent Reboots: It's important not to reboot the system unnecessarily during the migration process. Frequent reboots can restart the download process, extending the duration of the migration and potentially leading to repeated "nothing seems to be happening" scenarios. By monitoring these specific events, you can effectively track and troubleshoot the migration process of your Surface Hub 2S.
Remote deployment via Intune
- If the Migration Launcher app fails to deploy, check any error messages in the Intune console.
- Verify that the Surface Hub 2S devices are correctly enrolled and online.
- Consider verifying whether another Store for Business offline-licensed application can be remotely deployed to Surface Hub 2S devices.
Feedback
Coming soon: Throughout 2024 we will be phasing out GitHub Issues as the feedback mechanism for content and replacing it with a new feedback system. For more information see: https://aka.ms/ContentUserFeedback.
Submit and view feedback for